Get directions
When you receive a letter from us for an appointment you will be provided with a location code. Enter the location code or name below to view directions to help you find your way.
No matches found.
Select a location below to find out how to get there. Directions assume that you are starting inside the Main Hospital Building.
-
A01
Imaging
-
A04
Wishlist
-
A05
Sunshine Coast Health Institute (SCHI)
-
B01
Adem Crosby Cancer Care
-
B02
Pastoral Care
-
B03
Transit Lounge
-
A10
Clinic 4
-
B04
Aboriginal & Torres Strait Islander Health
-
A11
Clinic 5
-
A12
Diagnostics Clinic
-
A13
Audiology
-
A14
Clinic 3
-
A15
Clinic 2
-
A16
Clinic 1
-
A17
Pharmacy
-
B10
Executive Reception
-
B12
Clinic 7
-
B11
Renal Clinic
-
B13
Clinic 6
-
A20
Clinical Research
-
A21
Dental Service (Oral Health)
-
A22
Day Surgery
-
A23
Intensive Care (ICU), Paediatric Critical Care Unit (PCCU)
-
B20
Clinical Investigations (CIU)
-
B21
Cardiac Care
-
A30
Ward 3A
-
A31
Ward 3B
-
A32
Sleep Assessment
-
B30
Ward 3C
-
B31
Ward 3D
-
A40
Ward 4A
-
A41
Ward 4B
-
A42
Child and Adolescent Unit
-
A43
Child and Adolescent Outpatients
-
A44
Maternity Outpatients
-
B40
Ward 4C
-
B41
Ward 4D
-
B43
Birthing
-
B42
Neonatal Intensive Care Unit (NICU)
-
B44
Maternity Ward
-
A50
Ward 5A
-
A51
Ward 5B
-
A52
Rehabilitation Unit
-
B50
Ward 5C
-
B51
Ward 5D
-
Cancer Care Entrance
Cancer Care Entrance
-
Frazer Lane Entrance
Frazer Lane Entrance
-
Emergency
Emergency
-
Main Entrance
Main Entrance
-
Main Reception and Cashier
Main Reception and Cashier
-
Mental Health Services
Mental Health Services
-
Parking (P1)
Car park
Using a location code to find your way
The first two characters of the code show the zone and level number to help you find your way. The full code will match signage at the correct location.
- From one of the hospital entrances use the letter at the beginning of your code (A or B) to identify the correct zone, indicated by signage and colours (blue for zone A and green for zone B).
- Use the first number in your code to identify the correct level (0 to 5). If required, use the lift in the correct zone to move to the correct level.
- From the lift/entrance follow signs to find the department location matching your full code.
High contrast colours and tactile Braille signs are used to help people with visual impairments find their way.
Please note you can only move between zones A and B on floors zero and one, so make sure you are in the correct zone before using a lift.
If you don’t know where to go you can:
- view directions by entering a location code or name above
- have a chat to one of our friendly volunteers or staff members
- go to the front reception desk in the foyer of the hospital.
More information
Zones
The main hospital building is split into two zones. We've used signage and high contrast colours on the walls and at lifts to help you identify which zone you are in and key destinations within each zone.
We love where we live, and we wanted to bring as much of our natural landscape into our hospitals as possible. Zone A is blue, and represents our beautiful waterways, rivers, and the beach. Zone B is green, and represents our hinterland, natural forests, farming land, and natural foliage.
The emergency department is separate to these zones and is coloured red for quick recognition.
 Zone A (blue) at the Northern end of the main hospital building at SCUH and Zone B (green) at the Southern end.
Level and department numbering
Each level of the main hospital building is numbered, from zero (ground floor) to five. There are lifts in each zone to take you to the different levels within that zone.
Each department is numbered in order of the flow from the lifts/entrances.
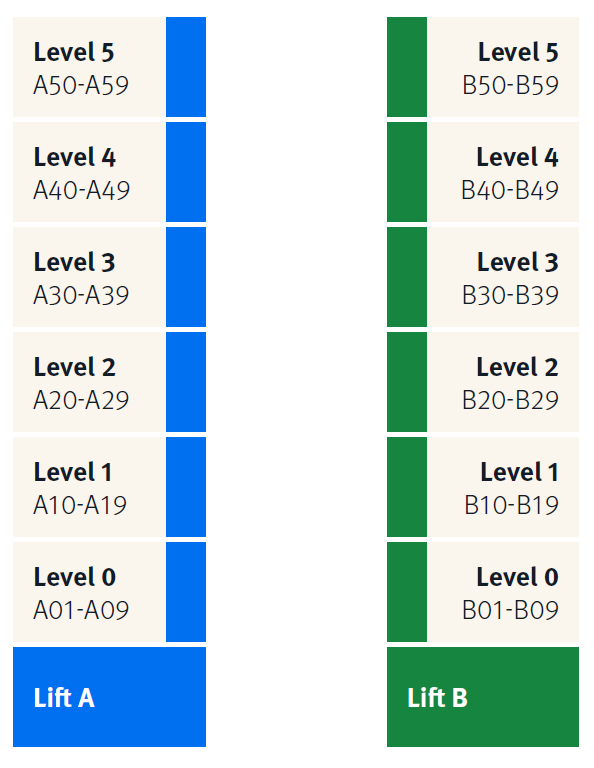
Lifts located within each zone of Sunshine Coast University Hospital provide access to department locations identified by the full location code.